🏁 Getting Started
🎉 Welcome to Open Ticket!
Hello there! Welcome to the documentation of the worlds most advanced and customisable open-source Discord ticket bot! You can use Open Ticket to manage support, applications, feedback, reports, approvals and more within your server. Whether you're running a gaming community, business, or huge server, Open Ticket makes handling tickets fast, efficient, and user-friendly.
In this guide, we'll walk you through the basics of setting up Open Ticket in your server. By the end, you'll have a fully functional ticket system that fits your needs.
Getting Started
The official Open Ticket setup guide
🎯 Features
Here are some of Open Ticket's most well-known features!
✔️ Create and manage tickets with ease
✔️ Advanced customisation
✔️ Fully customizable ticket panels, options & questions
✔️ Secure permissions & role-based access
✔️ Supports HTML & Text Transcripts
✔️ Available in more than 20+ languages
✔️ Optimized for large servers
✔️ Powerful plugin system
✔️ Fully compatible with Pterodactyl panels
Let’s get started! 🚀
📌 Prerequisites
Before we start, ensure that you have the following:
- Node.js v18+ installed on your system. (Download)
- A code editor, such as Visual Studio Code. (Download)
- A basic understanding of the Discord developer portal. (More Info)
- A basic understanding of how to configure a JSON file. (Tutorial)
- A place to host your Discord bot. (More Info)
💾 Installation
Downloading Open Ticket is quick and easy! Follow this guide to install the bot on your server and get it up and running in no time.
📥 Downloading
The latest version of Open Ticket is available on GitHub. We recommend downloading from the official repository to ensure you're using a secure and up-to-date version.
You can download Open Ticket in two ways:
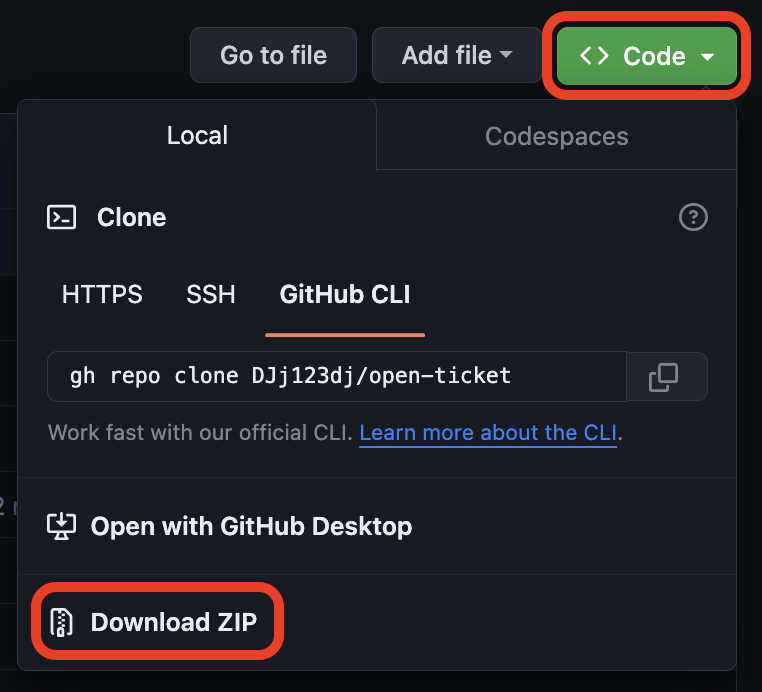
1️⃣ Download as a ZIP file (recommended)
- Visit the Open Ticket Github Repository
- Click the green "Code" button on GitHub and select "Download ZIP".
- Extract the ZIP file to a folder on your computer.
- Open your code editor in the extracted folder (where
index.jsis located).
 Open Ticket Github Repository
2️⃣ Clone the repository (not recommended)
git clone https://github.com/open-discord-bots/open-ticket.git
cd open-ticket
📦 Installing Dependencies
Before running Open Ticket, you need to install the required npm packages.
- Open a terminal or command prompt in the Open Ticket folder (where
index.jsis located). - Run the following command to install all necessary dependencies:
npm install
⚙️ Choosing a JavaScript Engine
Open Ticket runs on Node.js (v18 or above) but also supports alternative engines like Deno and Bun.
You can skip this section if you're using an external hosting provider or dashboard.
Bun & Deno are not officially supported by Open Ticket. Use them at your own risk!
If you're new to this, we strongly suggest using Node.js, as it's the default and most supported option.
🔗 Download the engine of your choice:
Once you've installed your engine, you're ready to configure Open Ticket! 🚀
🤖 Creating Your Discord Bot
Before using Open Ticket, you need to create a Discord bot. This bot will act as the bridge between your server and Open Ticket, allowing users to create and manage tickets.
🛠️ Creating The Bot
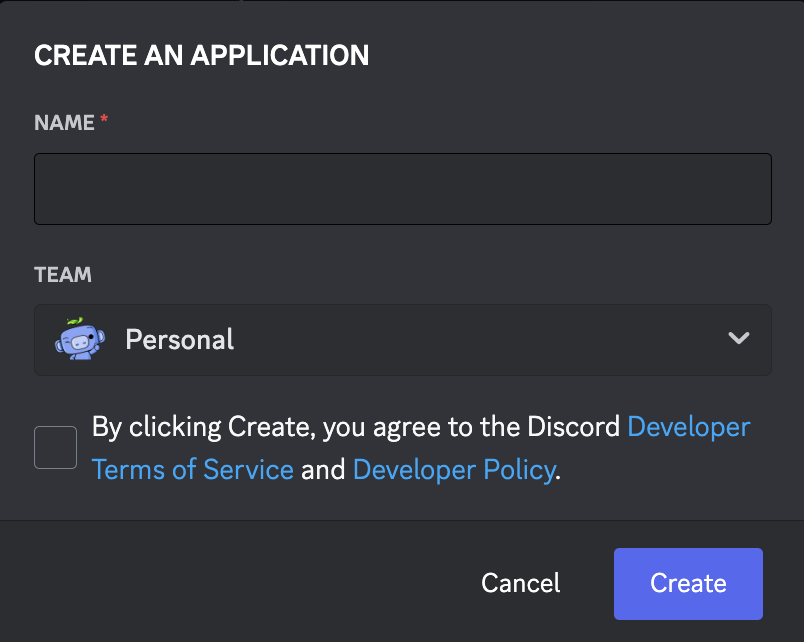
- Go to the Discord Developer Portal.
- Click "New Application" and give your bot a name.
- Navigate to the "Bot" section and click "Add Bot".
- Copy the bot token—you will need this later to start Open Ticket.
 Discord Developer Portal
NEVER EVER share a Discord token! With the bot token a hacker could control your entire bot!
DJdj Development will never ask for your bot token!
🚨 Possible Concequences:
- Your server could get raided.
- Users can get roles they shouldn't have access to.
- Messages in restricted channels can be logged.
- Users could get mass-banned.
- And much more...
🔐 Protecting your token:
- Never send a token in DM or server.
- Never upload a token to GitHub. Use the
.envfile instead! - Don't share the token between multiple users.
- Make sure the token isn't included when you send the
general.jsonto someone who wants to help you.
✋ Enabling Privileged Intents
Discord requires bots to enable certain intents to access specific data, such as messages and member updates.
Without these, some features of Open Ticket will not work.
- In the Developer Portal, go to your bot’s "Privileged Gateway Intents" section.
- Enable the required intents.
- Save your changes.
Required Intents:
- Message Content Intent (Required for transcripts & text commands)
- Server Members Intent (Required for user management, participants & roles)
- Presence Intent (Optional, only used by plugins)
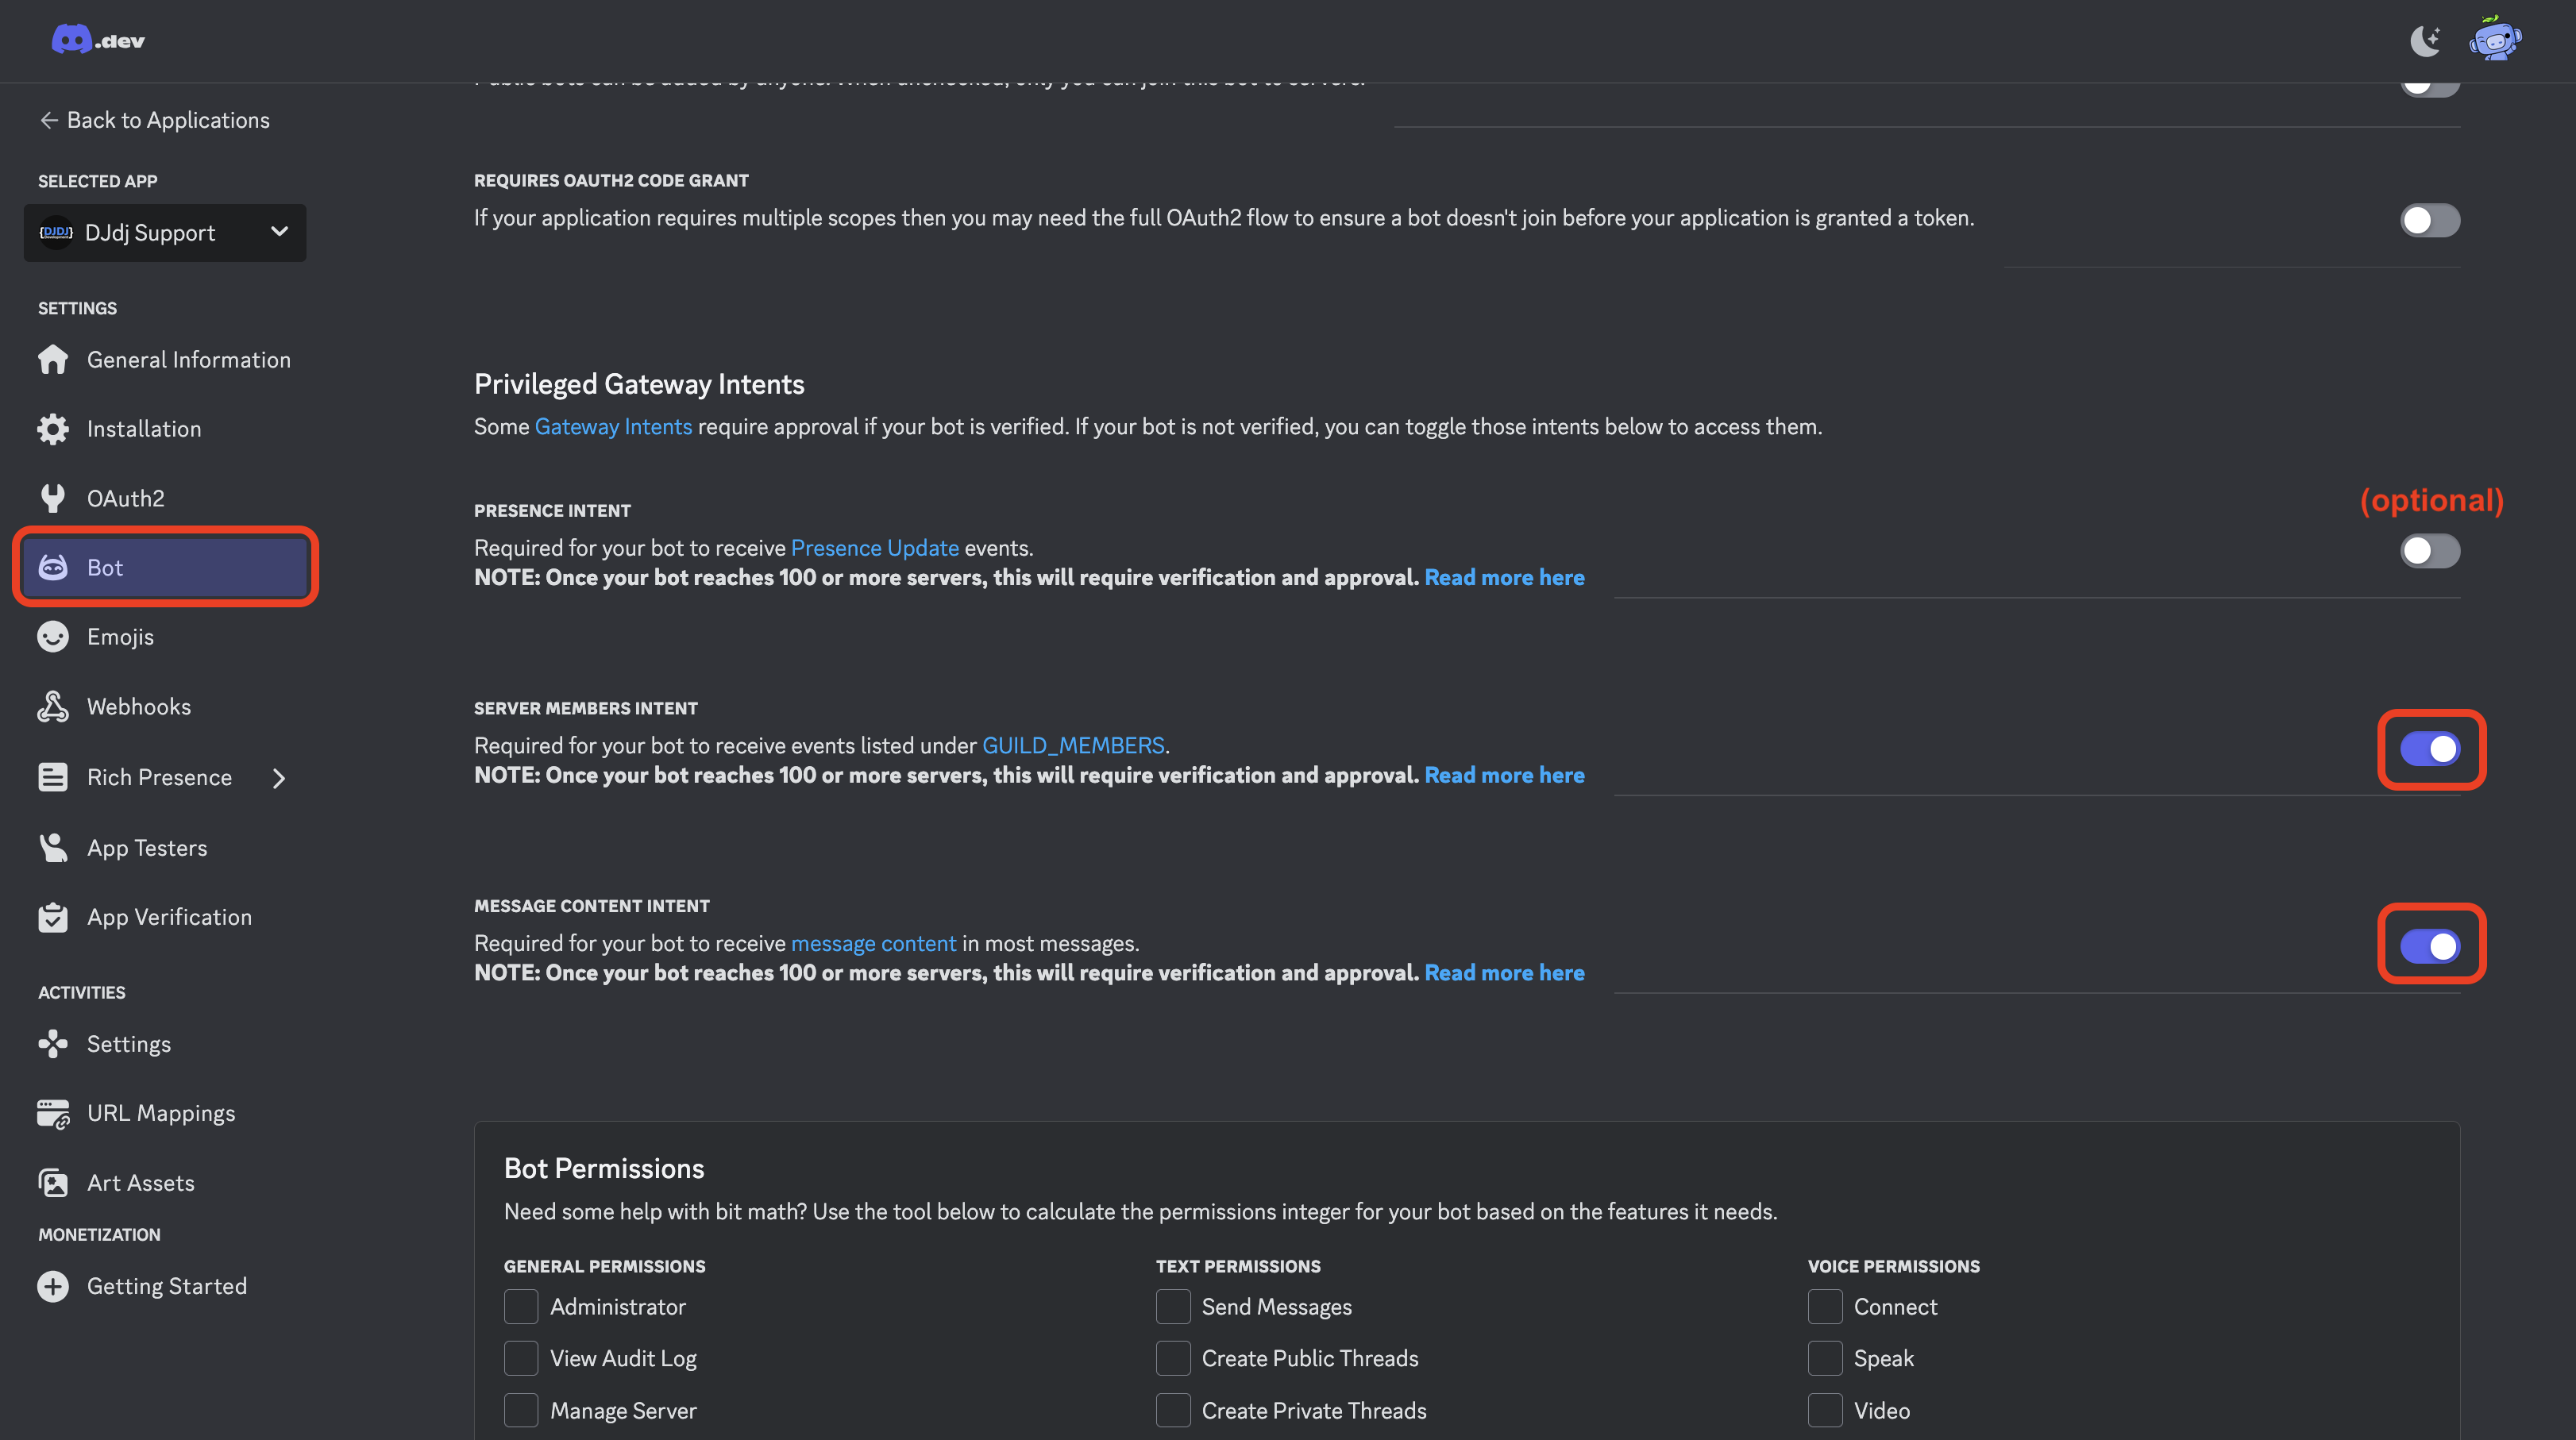 Configure the correct Discord Bot intents
🔐 Setting Bot Permissions
When inviting your bot to your Discord server, you need to grant it sufficient permissions to function properly.
Insufficient permissions could result in weird errors and glitches.
For the best experience, we highly recommend granting your bot the Administrator permission.
This ensures the bot has all the access it needs without running into issues.
If you prefer a more restrictive setup, you can manually configure permissions, but be aware that missing certain permissions might break some features.
Once you've completed these steps, your bot is ready to be added to your server! 🚀
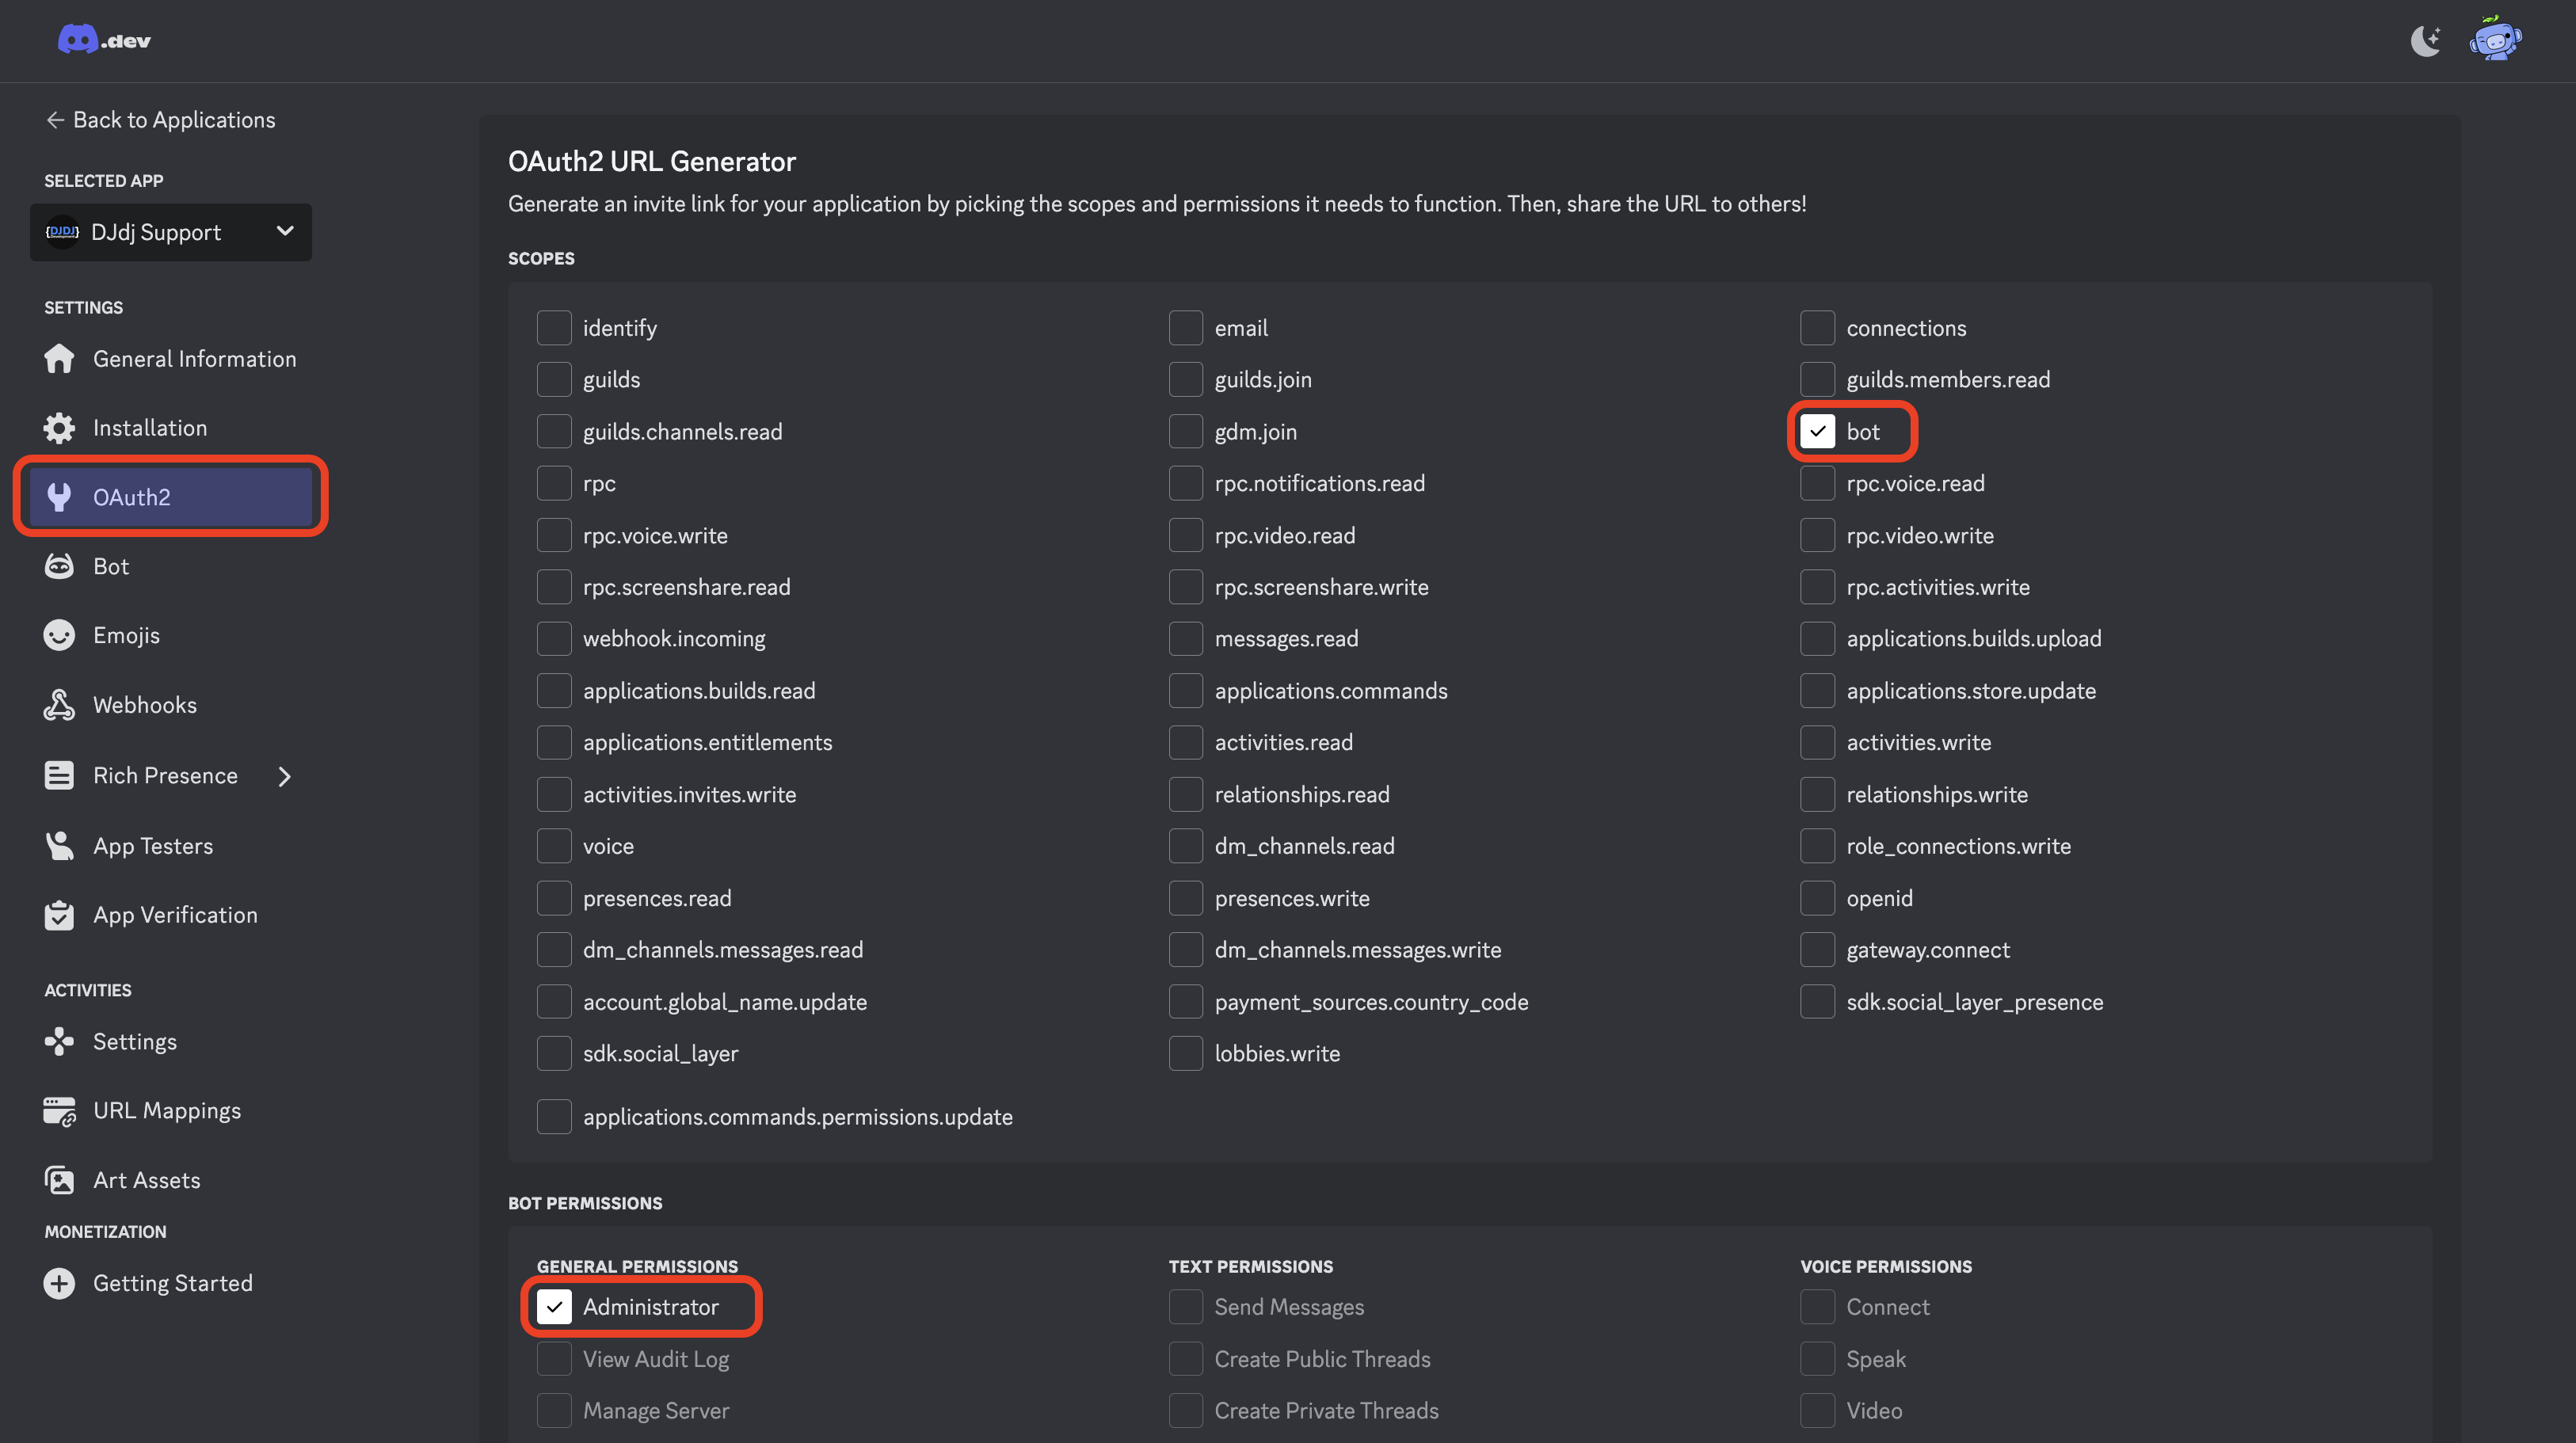 Configure the correct Discord Bot permissions
👋 Inviting The Bot
Once your bot is set up, you need to invite it to your Discord server using an OAuth2 URL which can be found below the permissions. Copy the generated invite link and open it in your browser. Select your server and click Authorize.
 Copy the OAuth2 URL of your Discord Bot
Your bot should now appear in your server! 🎉
⚙ Configuration
Open Ticket is fully configurable using five JSON config files. Each file controls a different aspect of the bot, allowing you to customize everything from ticket options to panel layouts. Here’s a breakdown of each config file and what they do:
💼 config/general.json – General Bot Settings
This file contains the core settings of Open Ticket, including:
- Bot token - never share this
- Bot Status - configure the bot status
- Primary Color - for embeds and messages
- Permissions - who can manage tickets
- Extra settings - button visibility, emojis & additional settings
📌 This is the most important config file!
❓ config/questions.json – Custom Ticket Questions
This file defines questions that users must answer before opening a ticket.
- Each question is shown in a form (modal) before ticket creation.
- You can add up to 5 questions per ticket type.
- Questions can have custom names, placeholders, and input limits.
📌 If no questions are configured, tickets will open immediately!
🎟 config/options.json – Ticket Types & Buttons
This file defines the ticket options, which appear as buttons or dropdown items in your panel.
- Each option represents a ticket type, website link, or reaction role.
- You can customize admins, embeds, and button layouts per option.
- Options can be linked to specific questions (from
questions.json). - Options can be used in panels (from
panels.json) to show them.
📌 If no options are configured, users won't be able to create tickets!
📜 config/panels.json – Ticket Panels & Embeds
Panels are the embeds/messages that display the ticket options in Discord.
- Each panel contains buttons/dropdowns linked to ticket options.
- You can create multiple panels for different categories.
- Panels can be fully customized with text, embeds, and layouts.
- Panels can be linked to specific options (from
options.json).
📌 After configuring a panel, use the /panel command to send it to a channel!
📂 config/transcripts.json – Transcript Settings
This file controls how ticket transcripts are saved when a ticket is deleted.
- Choose between HTML or text transcripts.
- Customize the transcript layout, colors, and format.
- Transcripts are disabled by default.
📌 Transcripts let you keep a record of past tickets for future reference!
🔧 How to Edit the Config
- Navigate to the
config/folder inside your bot’s files. - Open the JSON file you want to edit using a text editor.
- Modify the settings to fit your needs.
- Save your changes and restart the bot for them to take effect.
📌 Need more details? Check out the full config reference!
That’s it! You're ready to test the bot. 🎉
🚀 Testing
Now that you've configured the bot, it's time to run it and test if everything works as expected!
▶ Starting the Bot
Run the following command to start Open Ticket:
npm start
Or, if you don't have access to npm (e.g. on Pterodactyl dashboards):
node index.js
✅ Successful Startup
If everything is configured correctly, you’ll see Open Ticket’s startup screen in the console:
- 🟢 Open Ticket logo
- 🎉 Bot version, language, enabled flags and plugins
- 📊 Statistics (loaded options, panels, tickets, roles, etc.)
- 📝 Startup logs
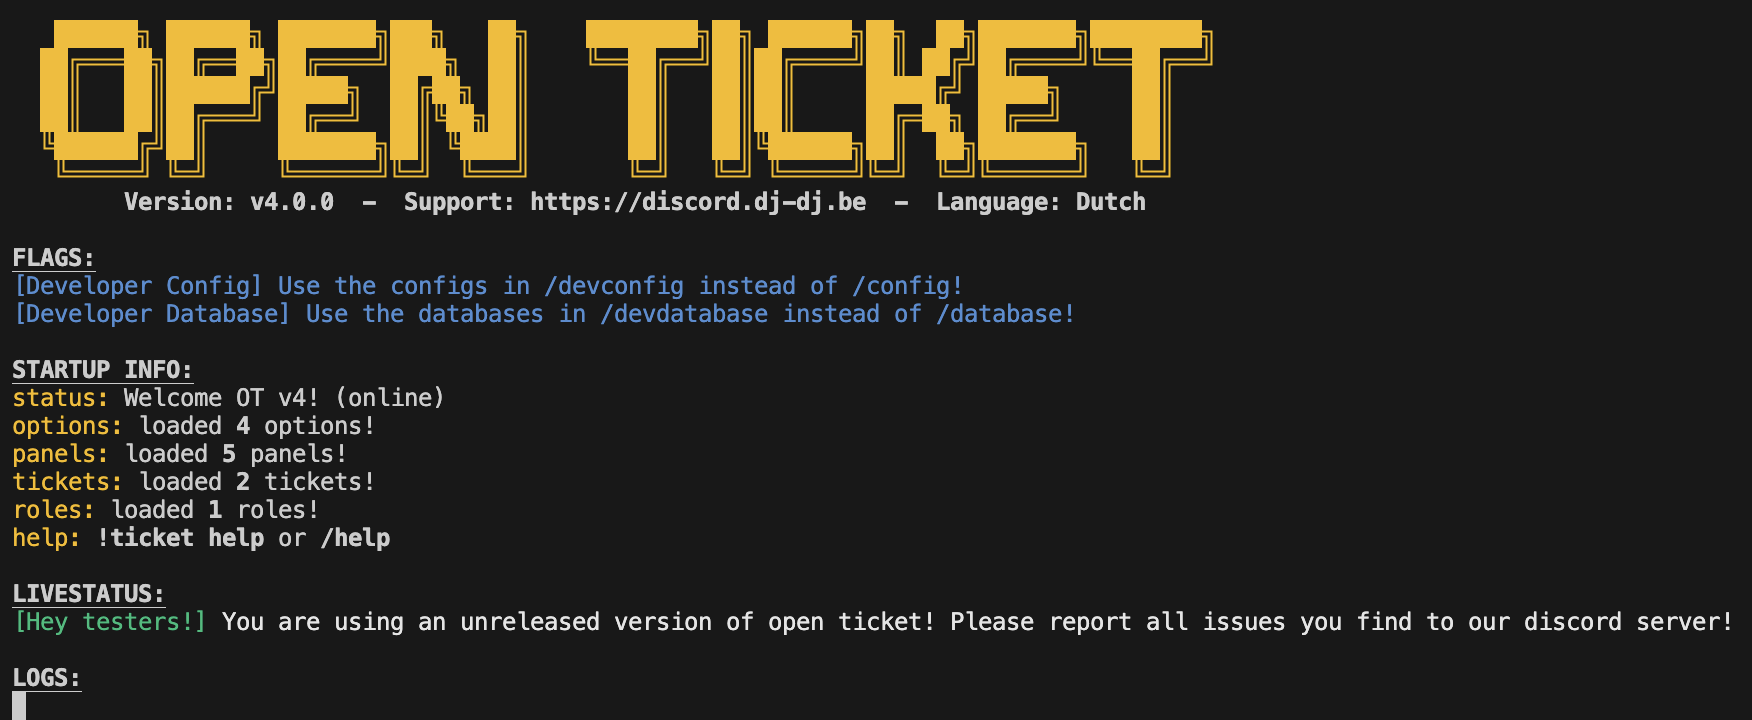 Open Ticket console on success
📌 If you see this screen, the bot is running correctly!
🟠 Configuration Error Startup
If there's an issue in your configuration, Open Ticket will display a Config Checker in the console.
This is a detailed list of all errors, including:
- 📌 Incorrect or missing values in the config files
- 🛠 Plugin-related config issues
- ❌ Duplicate IDs or invalid settings
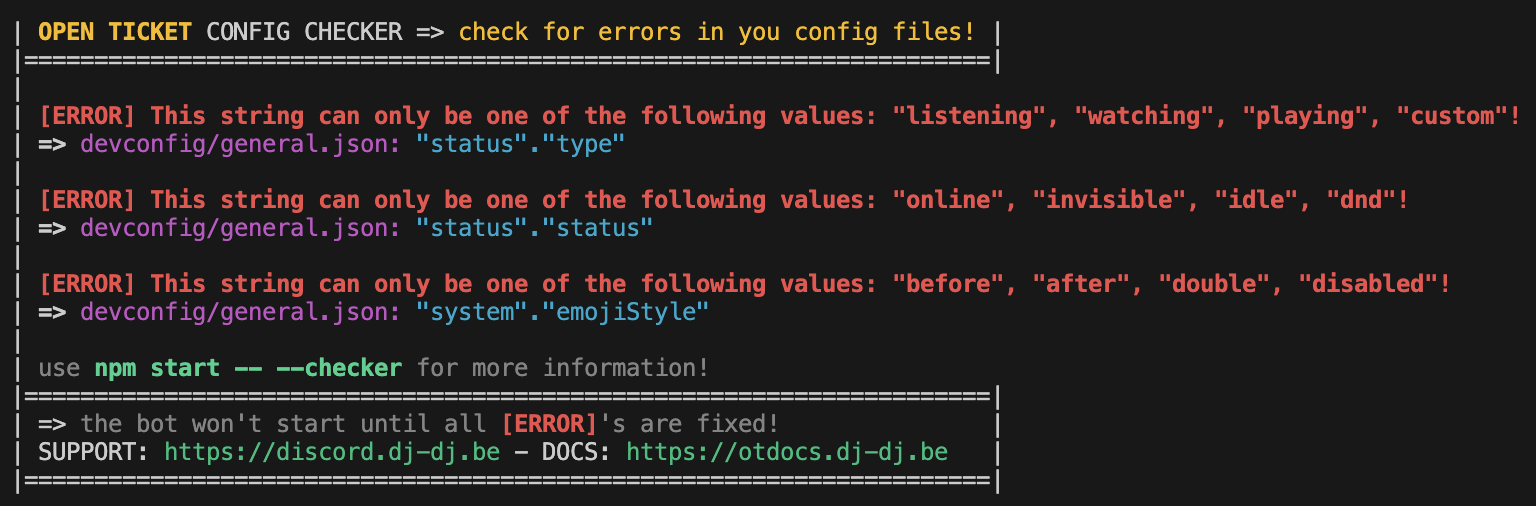 Open Ticket console on config failure
📌 Carefully read the errors and adjust your config files accordingly!
❌ Unknown Error Startup
If the bot shows an unkown error, there's probably something wrong with the code or an installed plugin. Please report these errors in our Discord server. Possible reasons for an unknown error include:
- ⛔ Plugin is incompatible with Open Ticket version
- 🛠 Plugin is not configured correctly
- ❌ Something went wrong with the bot
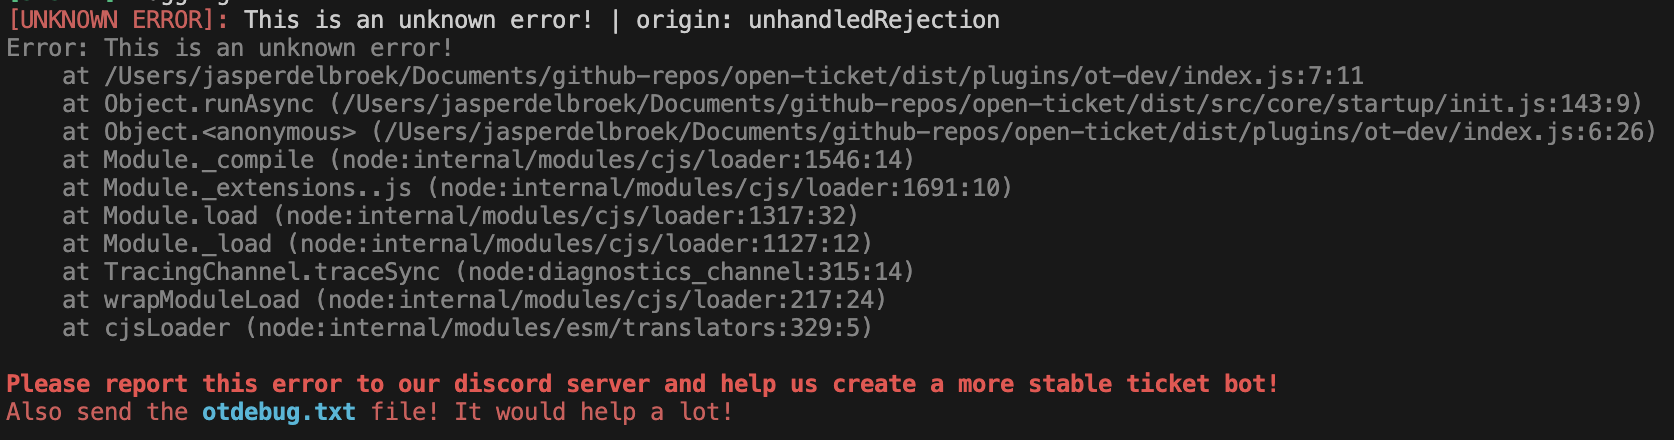 Open Ticket console on unknown error
💡 Still stuck? Check out our Config Error Guide or join our Discord server for help!
🎉 Testing in Discord
Now that the bot is running, try out some commands in Discord:
- View available commands -
/help - Send a panel with buttons -
/panel <id> [auto-update?] - Close a ticket -
/close [reason?] - Delete a ticket -
/delete [reason?]
 Open Ticket /help command.
🏆 Summary
Congratulations! Open Ticket should now be working inside your server. 🚀
Here’s what we covered in this guide:
- ✅ Configured Open Ticket with a valid configuration.
- ✅ Started the bot using
npm startornode index.js. - ✅ Handled configuration errors using the Config Checker.
- ✅ Tested the bot in Discord with commands like
/helpand/panel <id>.
Don't forget to give Open Ticket a star on Github to help us grow!